The SSTP Connect app is a flexible, user-friendly VPN client capable of handling two VPN protocols: SoftEther VPN and SSTP. This guide focuses on how to configure and connect to a SoftEther-powered VPN server using SSTP Connect app on iOS, iPadOS, and macOS (for M1 or newer Macs). Follow these simple steps to enjoy secure, stealthy, and reliable VPN access.
Note: You will need valid VPN credentials from your VPN provider (username, password, server IP/hostname, and a hub name). If you do not yet have an active VPN subscription, you can order one through the plans & pricing page.
You can download the SSTP Connect app from the iOS App Store. This app can be installed on iOS (iPhones), iPadOS (iPads), and macOS (all ARM-based Macs starting from M1):
Once installed, follow the steps below to set up and connect to your VPN server.
Step 1: Open the SSTP Connect App
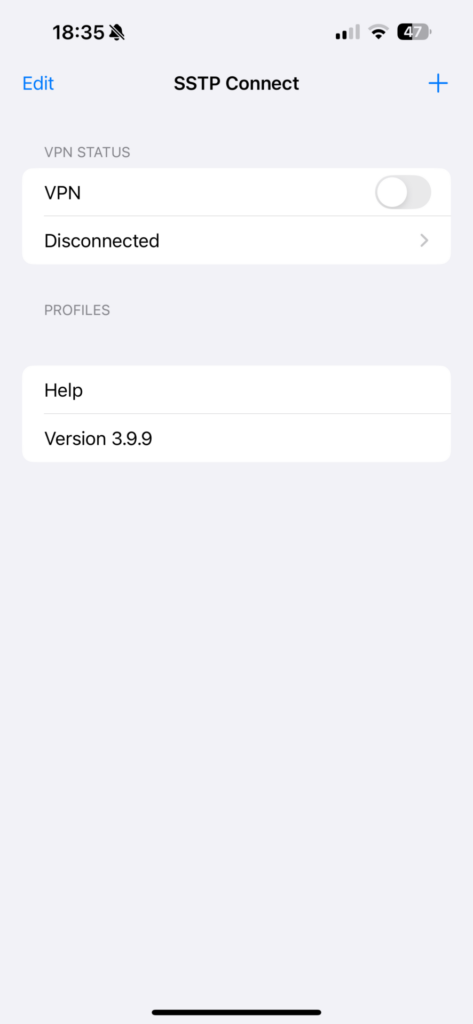
After installing, locate and launch the app on your device. You will see the main screen displaying the current VPN Status (Disconnected by default) and any Profiles you have created. Tap the “+” button in the top-right corner to begin adding a new VPN profile.
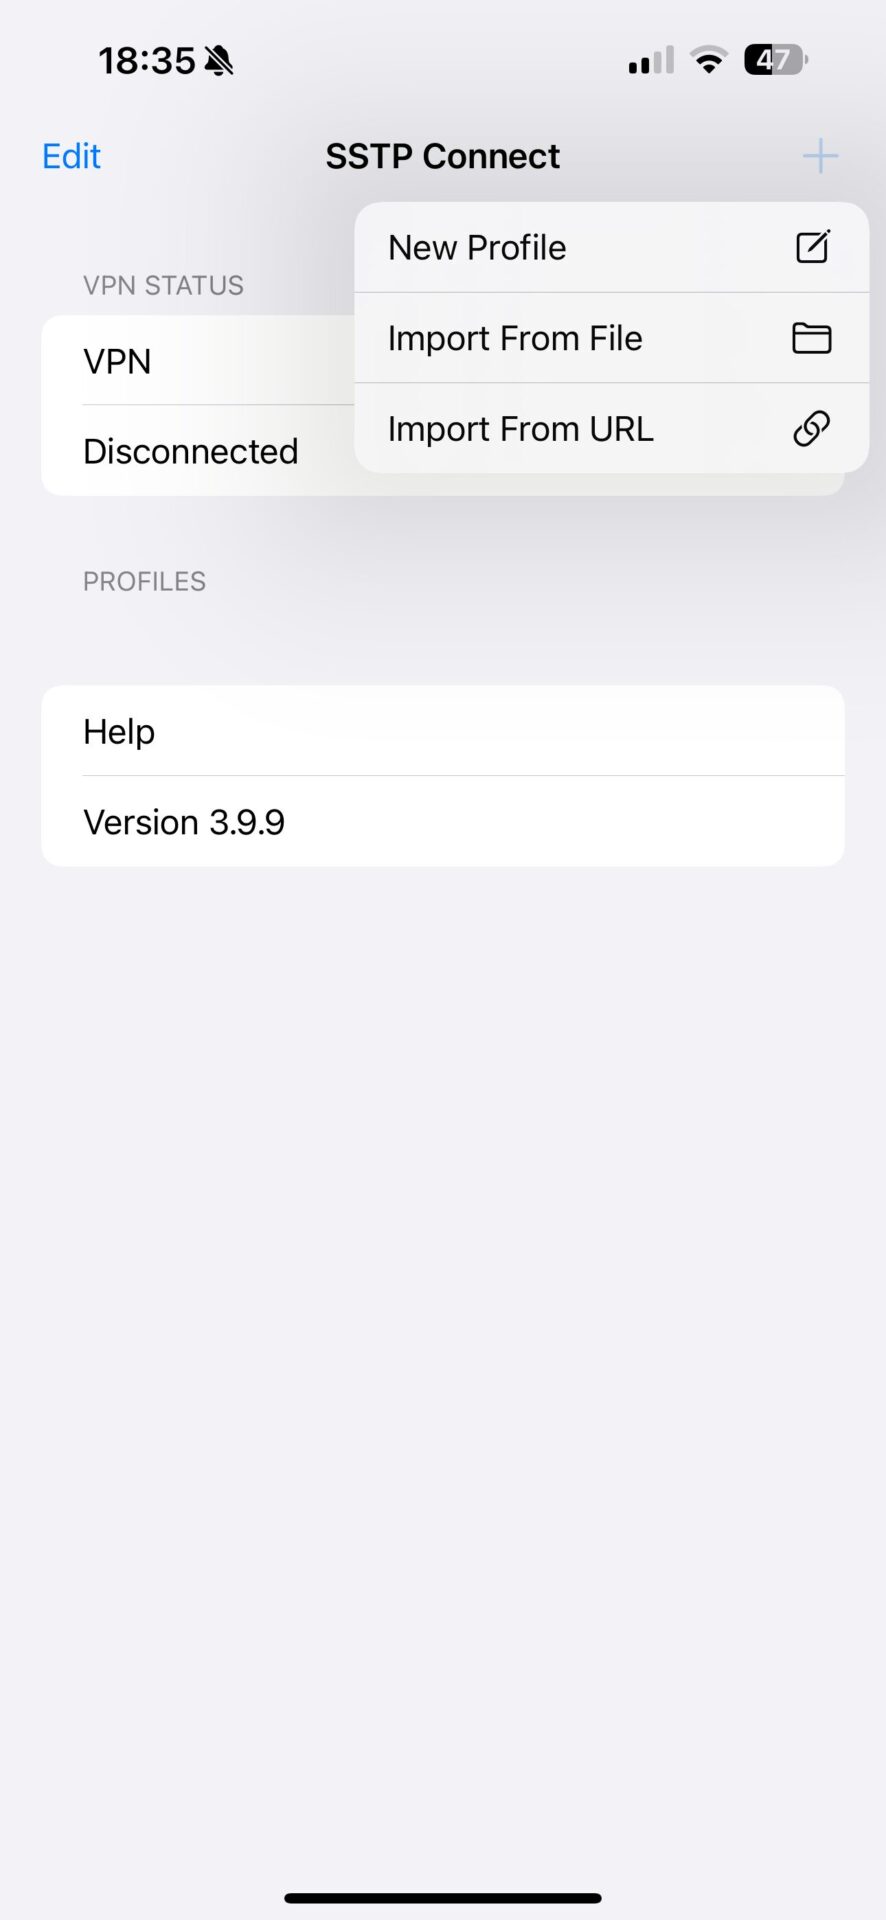
Tap the plus button in the top-right corner to add a new profile or import from file/URL.
Step 2: Create a New VPN Profile
Select “New Profile” to proceed.
Select “New Profile” to manually configure your VPN connection details.
Step 3: Enter Basic Connection Details
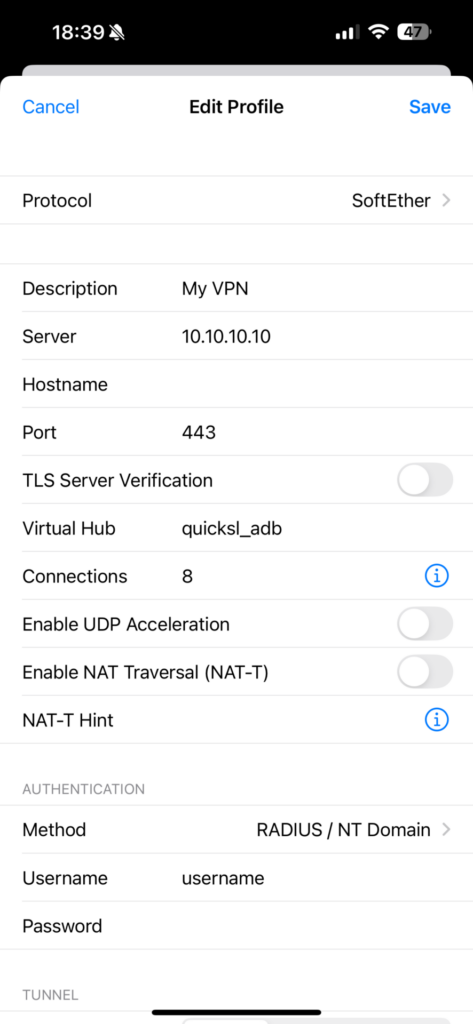
You will now see the Edit Profile screen. Fill in the following essential fields:
Protocol: Choose SoftEther.
Description: Pick a name for your profile (e.g., “My VPN”).
Server: Enter the server IP address provided by OBFUSGATED.
Important: Obtain the correct IP address from the “Connect to VPN” page (select the country you want to connect to and copy the IP address).
Hostname: You can leave this field blank.
Port: Input 443. This is a common port for SoftEther because it mimics HTTPS traffic, ensuring low visibility and making detection more difficult.
TLS Server Verification: Keep this option disabled when connecting to a server using it’s IP address.
Virtual Hub: Enter the hub name provided by OBFUSGATED. Tip: Hub names ending in _adb include ad-blocking features for enhanced security and privacy.
Connections: Set this value to 8. The actual number of connections may be automatically adjusted based on your VPN plan. A higher number can improve connection speed.
Enable UDP Acceleration and Enable NAT Traversal (NAT-T): Disable both for better stealth and compatibility.
NAT-T Hint: Leave this field blank.
Fill in the server details, protocol, credentials, and disable the “TLS Server Verification”, “UDP Acceleration” and “NAT Traversal”.
Step 4: Authentication Method & Credentials
Method: Select RADIUS / NT Domain as the authorization method.
Enter your Username and Password as provided by OBFUSGATED. These credentials can also be found on the “Connect to VPN” page.
Step 5: Tunnel & Advanced Options
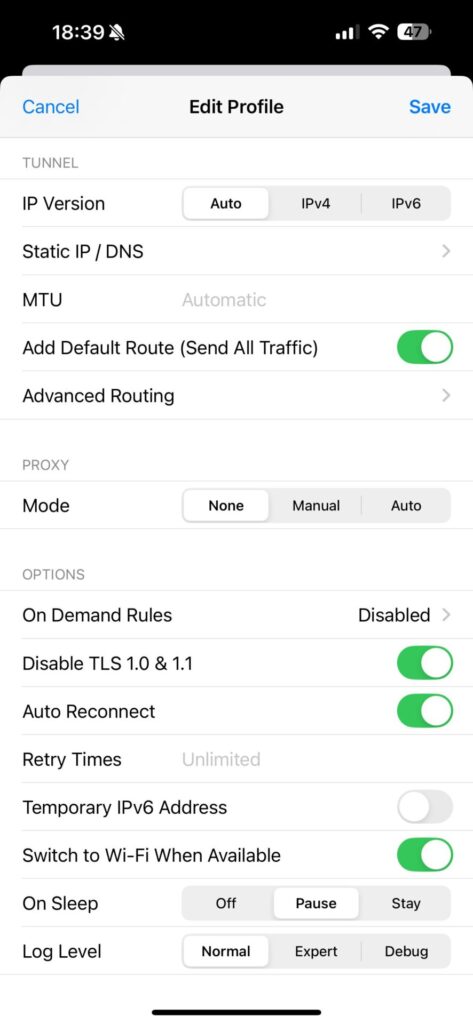
Scroll down to fine-tune the tunnel and connection behavior:
IP Version: Set to “Auto”.
Static IP / DNS: Leave both fields blank.
MTU: Leave at the default “Automatic.”
Add Default Route (Send All Traffic): Keep this option enabled for a full-tunnel VPN. Important: If you disable it, some of your traffic may leak outside the VPN tunnel.
On Demand Rules, Retry Times, Auto Reconnect:
Use On Demand Rules to automatically launch or disable the VPN for specific apps (you can leave it disabled by default, if you don’t need any specific rules).
Set Retry Times to “Unlimited”.
Enable Auto Reconnect so the VPN attempts to re-establish if the connection drops.
Switch to Wi-Fi: Keep this enabled.
Log Level: Set to “Normal “for everyday use or switch to “Expert” or “Debug” when you have issues with connecting to a VPN server and need more information to locate the problem.
Adjust the tunnel and connection settings, including IP version, routes, auto reconnect, and more.
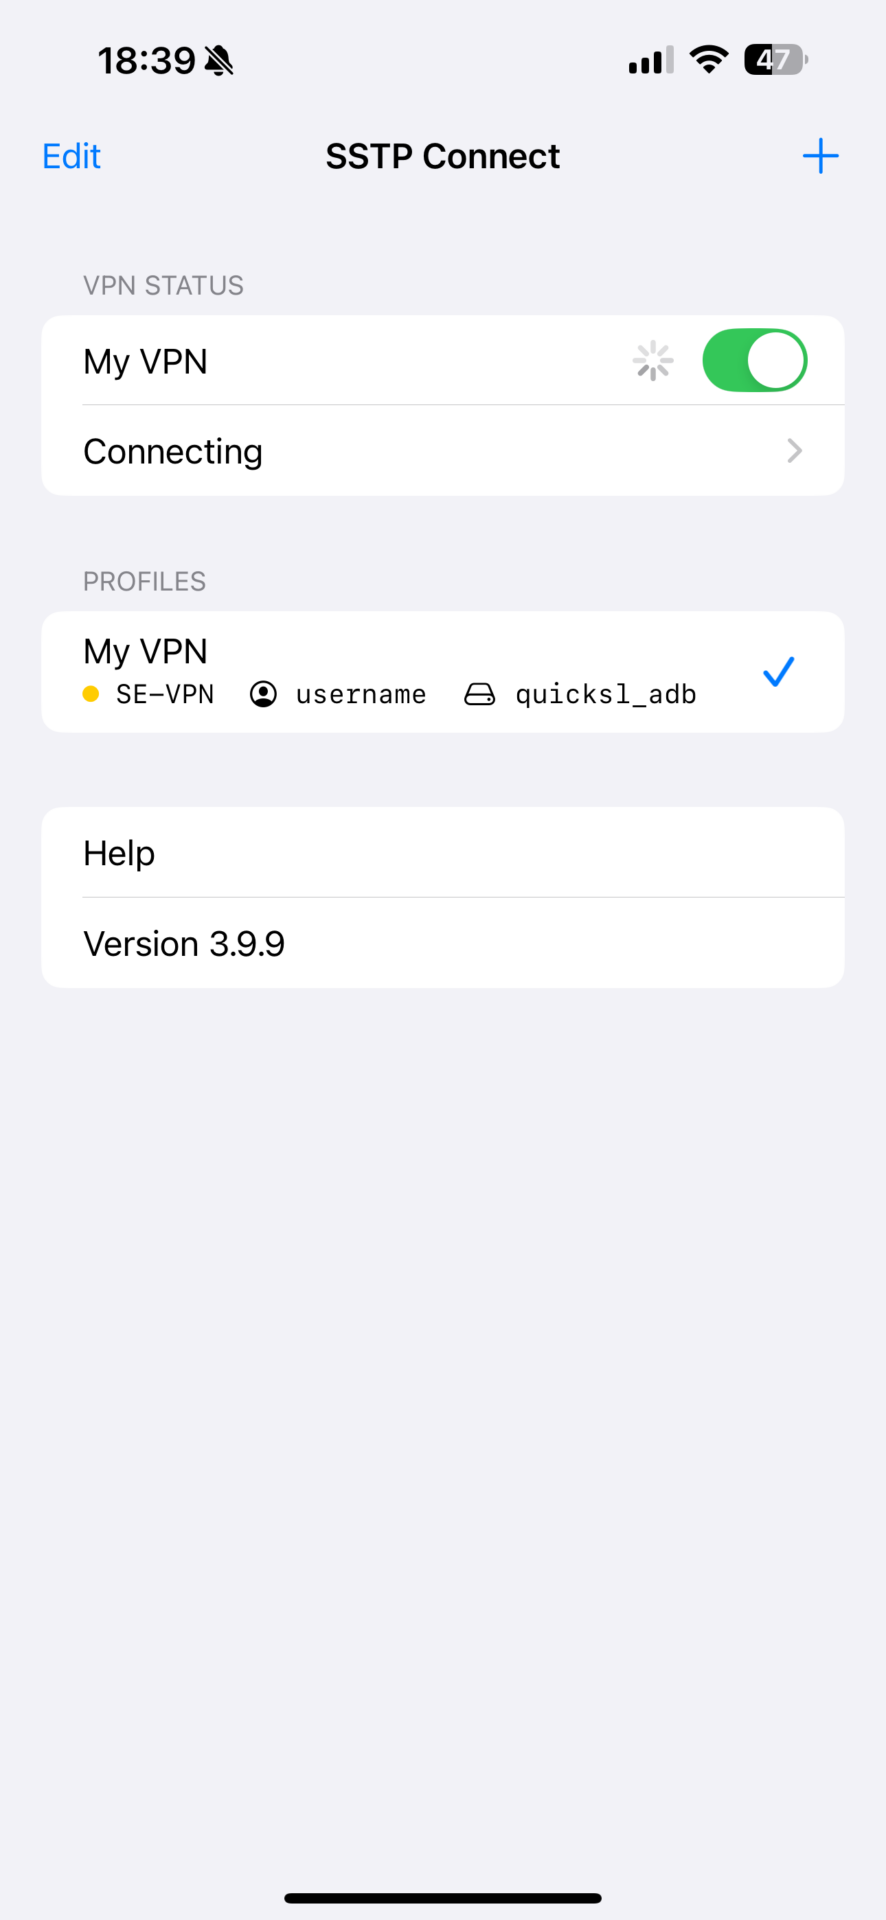
Step 6: Save Your Profile & Connect
Tap “Save” (top-right corner) once all fields are correctly filled in.
You’ll be returned to the main screen, where your newly created profile (e.g., “My VPN”) now appears.
Select the profile you’ve just created and toggle the switch beside it to connect. You’ll see the status change to “Connecting” and then “Connected” once the connection is established.
Tap the toggle to start the connection. The status will move from “Disconnected” to “Connecting,” and finally “Connected” if successful.
Step 7: Verify Your VPN Connection
After the app reports Connected, verify that you are indeed routed through the VPN:
Visit the IP check page to confirm you are connected to a remote VPN server and your IP address is now that of the VPN server.
When successfully connected via the SSTP Connect app, you benefit from end-to-end encryption, enhanced online privacy, and all of SoftEther’s stealth features. Enjoy secure browsing, access to geo-restricted content, and a layer of protection on public networks.
That’s it! If you encounter issues, double-check your credentials and server details or consult the VPN provider’s support for further assistance.
FAQ
SSTP Connect is officially supported on iOS, iPadOS, and macOS devices with ARM processors (M1 or newer). If you have an Intel-based Mac, check the app’s system requirements or your VPN provider’s recommendations for a compatible VPN client.
SoftEther commonly uses port 443 because it mirrors standard HTTPS traffic. This stealth approach makes your VPN connection harder to detect or block by firewalls and ISPs, enhancing overall privacy and reliability.
OBFUSGATED provides the username, password, and a hub name. You can find these details on “Connect to VPN” page, under the server information. Make sure to enter the correct IP address and hub name.
Disabling UDP Acceleration and NAT Traversal (NAT-T) often improves stealth. Some VPN providers deactivate these features on the server side to mimic regular HTTPS traffic, minimizing the chance of VPN blocking or throttling.
Yes. Enabling “Add Default Route” sends all of your device’s traffic through the VPN, ensuring nothing leaks outside. Disabling it can allow certain apps or services to bypass the VPN, which may compromise privacy and security if not configured properly.
Once the SSTP Connect app shows “Connected,” visit an IP-check website or OBFUSGATED IP-check page. If your public IP changes to match the VPN server’s location, you’re successfully connected and secured.
SoftEther offers robust encryption, improved stealth (since it appears as HTTPS traffic), and optional ad-blocking hub support. When paired with SSTP Connect, you get an easy setup, reliable connections, and a seamless way to bypass network restrictions.