This article is a guide on how to install and configure the SoftEther VPN Client Manager on Windows, macOS, and Linux to connect to obfuscated SoftEther-based VPN servers. This powerful application is free, easy to install, and offers robust encryption and stealth features to ensure your online activities remain private and secure.
Note: You will need valid VPN credentials from your VPN provider (username, password, server IP/hostname, and a hub name). If you do not yet have an active VPN subscription, you can order one through the plans & pricing page.
Once you have your VPN credentials on hand, proceed with the steps below to set up the SoftEther VPN Client Manager.
Step 1: Download and Install the SoftEther VPN Client
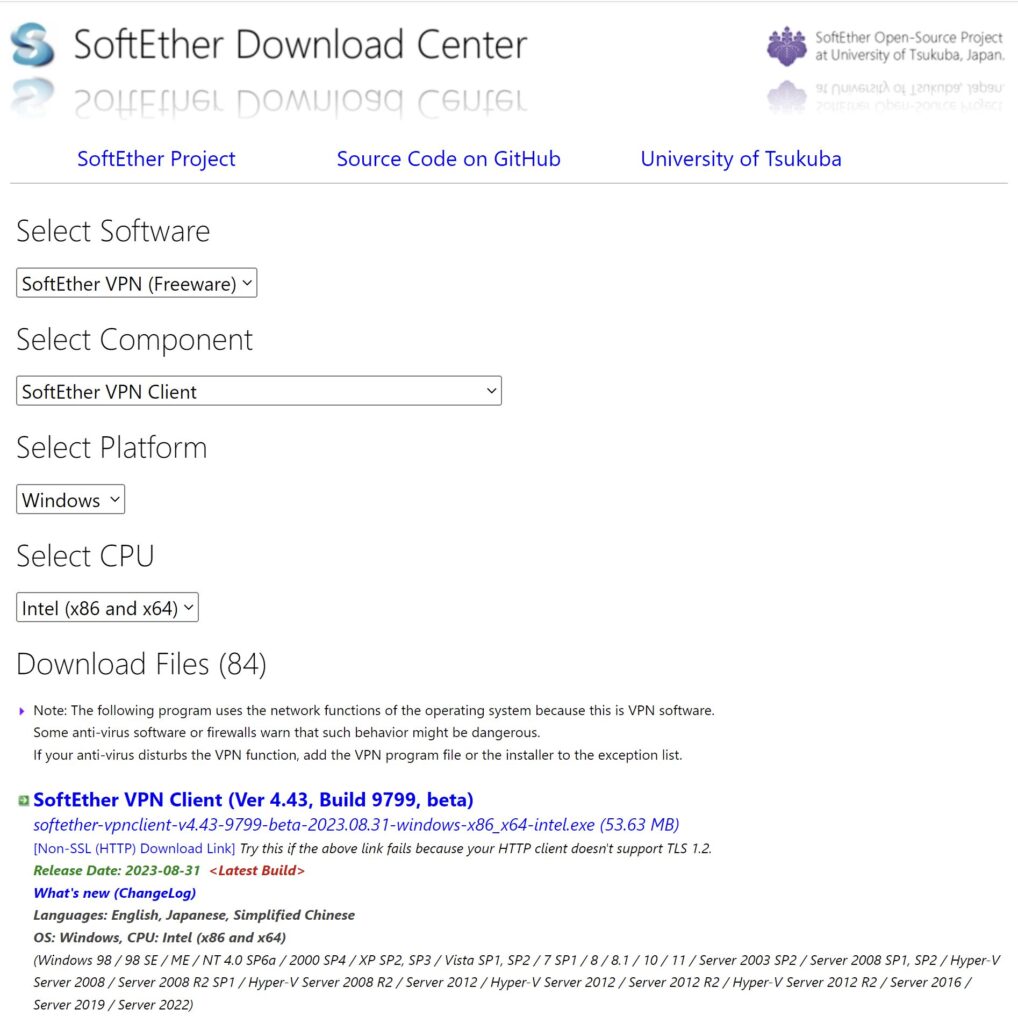
Visit the official SoftEther download page and get the latest version of the SoftEther VPN Client for Windows, macOS, or Linux. In this guide, we will be configuring the SoftEther VPN Client on Windows. The download link for the latest release is available on the SoftEther downloads page:
Select “SoftEther VPN Client,” choose Windows & the correct CPU type, then click the download link to save the installer.
Once downloaded, run the installer and follow the on-screen instructions to install the app.
Step 2: Launch the SoftEther VPN Client Manager
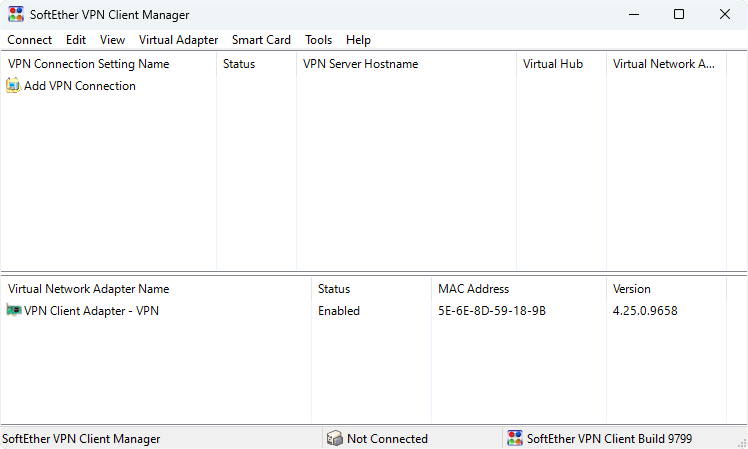
After installation, open the SoftEther VPN Client Manager. You will see two main sections:
The upper area where your VPN Connections will be listed.
The lower area showing the Virtual Network Adapter details.
Click on “Add VPN Connection” in the upper section to set up a new VPN сonnection.
Step 3: Create a New VPN Connection
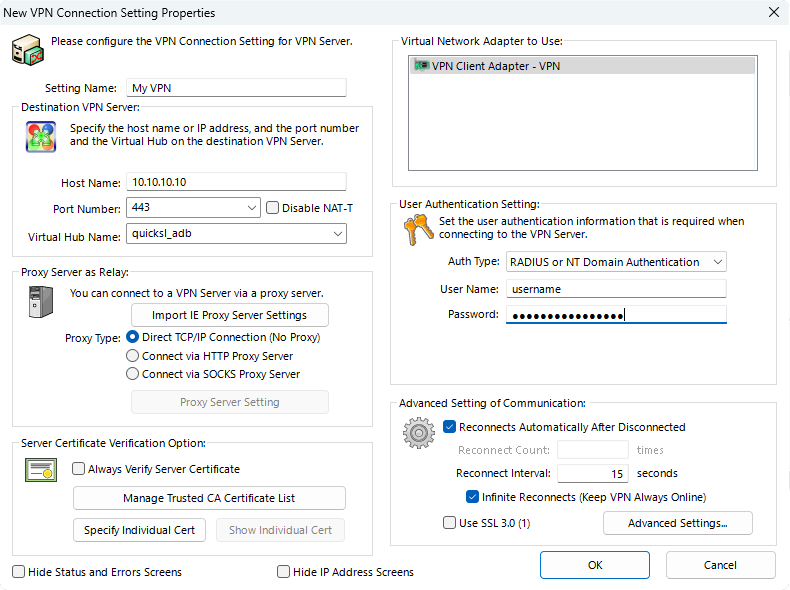
Click on “Add VPN Connection” in the upper left section to open the “New VPN Connection Setting Properties” window. Here you will input the essential connection details:
Setting Name: Pick any name, for example “My VPN.”
Host Name: Enter the server IP address provided by OBFUSGATED. Important: Obtain the correct IP address from the “Connect to VPN” page (select the country you want to connect to and copy the IP address).
Port Number: Input 443. This is a common port for SoftEther because it mimics HTTPS traffic, ensuring low visibility and making detection more difficult.
Virtual Hub Name: Enter the virtual hub name provided by OBFUSGATED (e.g., quicksl_adb). Tip: Hub names ending in _adb include ad-blocking features for enhanced security and privacy.
Auth Type: Choose “RADIUS or NT Domain Authentication“.
User Name & Password: Enter your Username and Password as provided by OBFUSGATED. These credentials can be found on the Connect to VPN page.
Use SSL 3.0: Leave unchecked. SSL 3.0 is outdated and generally not recommended.
Fill in the server details, port number, Virtual Hub, and your VPN credentials.
Step 4: Advanced Settings (Optional)
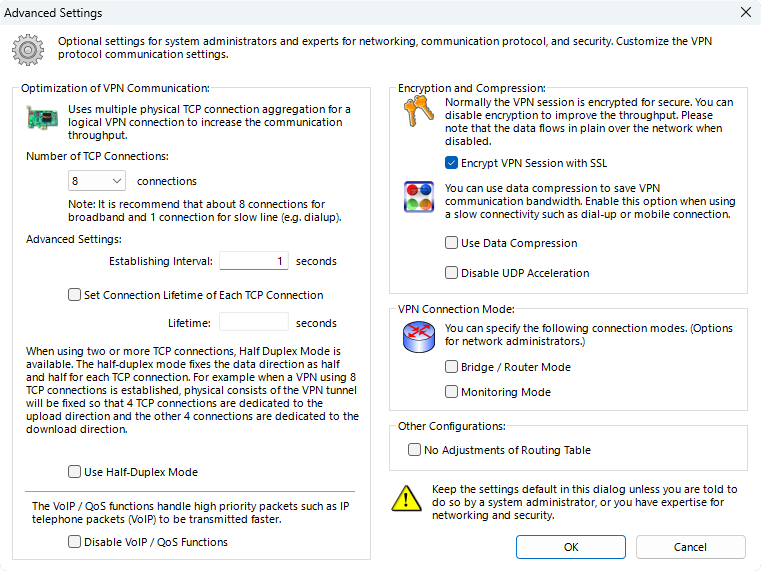
If you click the Advanced Settings button under the “Advanced Setting of Communication,” you will see options to tweak the VPN connection. In most cases, the default settings are sufficient. Modify these only if you are given special instructions or if you are comfortable tweaking advanced network settings.
Number of TCP Connections: Set this value to 8. The actual number of connections may be automatically adjusted based on your VPN plan. A higher number can improve connection speed.
Use Data Compression: Leave disabled.
Disable UDP Acceleration: The UDP acceleration is disabled on our servers for better stealth and compatibility. Checking/unchecking this option will not change your connection status so you can safely leave it unchecked.
Bridge / Router Mode: Keep both options disabled.
No Adjustments of Routing Table: Leave unchecked to ensure all traffic goes through the VPN.
Adjust advanced settings like multiple TCP connections, encryption, compression, and more.
Step 5: Connect to Your VPN Server
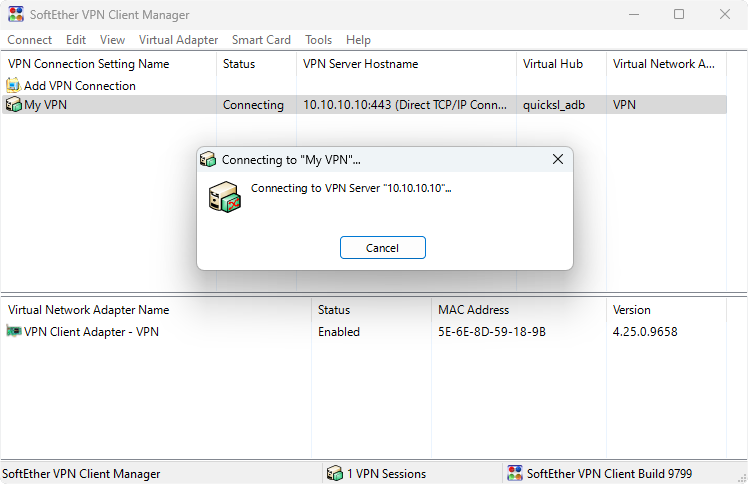
After saving your connection settings, you should now see your newly added connection (e.g., “My VPN”) in the SoftEther VPN Client Manager. Simply double-click it or select the connection and click “Connect”. A status window will appear, indicating the connection process.
Simply double-click your newly created connection to initiate your secure tunnel. The status will go from “Connecting” to “Connected” if successful.
Step 6: Verify Your VPN Connection
Once the connection status changes to Connected, you can confirm that your traffic is routed through the VPN server by visiting the IP check page to verify that your public IP address matches the VPN server’s location.
With SoftEther’s powerful features, you get the robust encryption, stealth capabilities that mimic standard HTTPS traffic, and enhanced online privacy against potential eavesdroppers. Enjoy safe browsing, access to geo-restricted content, and peace of mind on public Wi-Fi networks.
That’s it! If you encounter any difficulties, double-check your credentials and server details, or consult OBFUSGATED for additional support. Enjoy your secure obfuscated SoftEther VPN connection!
FAQ
SoftEther offers strong security, multi-protocol support, and stealth features that mask your VPN traffic as regular HTTPS data, minimizing detection.
Check your server IP/hostname, ensure the correct port is entered (in most cases it must be 443), and make sure your internet connection is stable.
SSL 3.0 is outdated and generally not recommended. Use TLS-based encryption (default in SoftEther) for optimal security unless directed otherwise.
Yes. Disabling these options can help bypass certain network restrictions and deepen stealth.
Click “Add VPN Connection” again and configure each connection with unique settings (server, credentials, hub name). Then connect to any profile as needed.
Speed depends on factors like your base internet speed, server location, network congestion, and the number of TCP connections configured.
During the connection setup, specify “Connect via HTTP Proxy Server” or “Connect via SOCKS Proxy Server.” Enter the correct proxy details from your provider.
Yes. SoftEther supports Windows 98 through Windows 11. Verify from the official download page that your OS is listed as compatible.
Yes, you can create profiles on different devices (Windows, macOS, Linux) using the same server address and credentials, provided your VPN subscription permits the number of multiple simultaneous connections that you need.
Port 443 is rarely blocked because it is essential for secure HTTPS internet traffic. Consequently, obfuscated VPNs often use this port to mimic regular web traffic effectively. If you encounter restrictions, you can switch to a custom port by consulting your VPN provider.